an integration testing nightmare
May 12, 2016Motivation
Testing is a goal of many software teams. It’s widely considered “virtuous” in software engineering to build tests along with an application or library that effectively describes the desired behavior, and then quantitatively scores whether or not the software achieves its stated goals (the tests are the stated goals). This is commonly referred to test-driven development, or TDD. There are a couple of ways to go about writing tests, and one of the most widely discussed ways of testing is to write “unit tests” which by definition only test a single thing in isolation. Having your code be covered by as many unit tests as possible is a really good thing.
But sometimes testing is really hard. Sometimes you can’t effectively isolate the thing you want to test. Also, sometimes you want to test your software at a functional level, not at the unit level. This kind of testing is called “integration” testing, or “functional testing.” In web applications, integration testing often needs to be done through a browser. This allows testers (or a test system) to avoid a lot of the trouble of isolating portions of an application or system to test and to focus on the behavior of the thing as the user would see it.
Automated testing is more desirable than manual testing, and so in order to do that, it’s helpful to have a browser that can run on a server without needing a UI or any kind of interactive session. One would think that this problem would be more thoroughly solved than it is - but they’d be wrong, so here’s a brief description of how my team solved this problem in our situation.
Our goals are simple: automated tests, run on our CI server, with results for each build reported back through the build server application (TeamCity in our case).
What’s Available
Selenium has been around forever. The first I ever heard of doing testing through a browser, this is what it was. But Selenium didn’t replace the browser, they’ve just made them scriptable. There are probably many situations where Selenium makes all the sense in the world, but in our case we didn’t want the hassle of supporting a browser and all that would go with that. Also, none of us has experience with Selenium, so it felt like a steep learning curve.
Something we could install via NPM and for which we could write scripts was what we had in mind, and we found PhantomJS, which seemed to fully fit the bill. It’s an adapted distribution of WebKit without the browser chrome, and there are integrations between it and TeamCity and the Mocha testing framework. Unfortunately, we had constant issues getting PhantomJS to run in our development environments, and building it from sources was, again, a bigger hassle than we wanted to take on. Also, NPM packages are unavailable in PhantomJS tests because it isn’t a Node module itself - it relies on the WebKit runtime. It acts as it’s own runtime in practice, so between the problems getting it to run at all, and the limitation to ES5-only, pure-javascript-only test scripts, we decided to take another look and see if there was something better.
Finally, I came across NightmareJS. NightmareJS is similar to PhantomJS, but it’s based on Electron instead of WebKit, and it is written as a Node module. It also has integration with Mocha, and it allows for both headless and non-headless testing. We hadn’t really thought about this at the outset, but it’s pretty useful to see your script playing out on the UI when you’re developing the tests (see below). On the CI server, the tests can be run in a headless mode. Finally, because Nightmare is a Node module, the test scripts look just like any other Mocha test instead of a script specific to another runtime as was the case with PhantomJS.
The Setup
We’re using Node 6 for our front-end builds, and what’s nice is that this lets us write ES6 in our test scripts. No webpack!
Our team utilizes MochaJS for our testing framework because it allows us to describe units simply, and there are runners that can report results to TeamCity in a way that it understands. So, in our package.json, we have some commands set up like this:
{
    // stuff
    "scripts": {
        "build": "webpack",
        "start": "webpack-dev-server --content-base build/ --hot --progress --colors --host 0.0.0.0",
        "test": "mocha \"test/!(integration)/**/*.js\" --require babel-core/register --require ignore-styles",
        "nightmare": "mocha \"test/integration/**.js\" --require co-mocha",
        "tc-test": "mocha -R mocha-teamcity-reporter \"test/!(integration)/**/*.js\" \
            --require babel-core/register --require ignore-styles",
        "tc-nightmare": "mocha -R mocha-teamcity-reporter \"test/integration/**.js\" --require co-mocha",
    }
}
Note that this isn’t valid JSON - I had to break a line to avoid a funky layout issue on the blog.
Hopefully this is fairly self-explanatory. To run the tests, we just invoke npm run nightmare on the console in a very similar way to the way we invoke our unit tests (npm run test). We created separates scripts for use on the CI server with the only difference being the type of reporter used to emit results.
Here’s quick little screencast I made of NightmareJS doing its thing, using an example from their GitHub repository. Bigger version here: recordit.co/wfjpxBVSyY
A Couple of Tricks
In order to run this thing headless on Linux, there’s one other thing that has to be configured: xvfb. Electron requires an X display to function, and xvfb creates a non-rendering X display for purposes just like these.
Another thing to note is that NightmareJS’s API is promise-based. This means you have to deal with that asynchronicity in your test scripts somehow. When just writing a script that will be run directly by Node, then you just call .end() and use .then() and .catch() to resume where the promise is fulfilled, just like you would in any JS application. However, in a testing scenario, you’re not running a script directly with Node, you’re using a test runner. In our case, Mocha. So we have to have something to handle the Promises for us: Co-Mocha. Look back up at our scripts definitions and you will see it required.
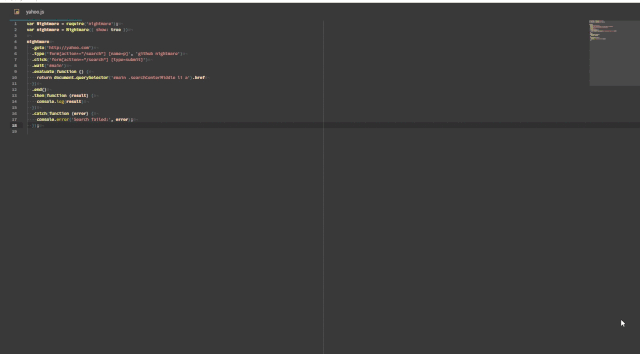
Here’s an example of one of our working tests (with some stuff changed to nonsense for privacy reasons):
var Nightmare = require('nightmare');
var expect = require('chai').expect; // jshint ignore:line

describe('Test Login', function() {
  it('Should be able to login successfully', function*(done) {
    this.timeout(10000);
    var nightmare = Nightmare();
    var link = yield nightmare
      .goto('http://our.website.com')
      .type('input[id="email"]', 'user@email.com')
      .type('input[id="password"]', 'password')
      .click('a[class="btn btn-inline btn-primary"]') // FIXME: we need an ID on the login button!
      .wait('.page-title')
      .evaluate(function () {
        return document.location.href
      })
      .end();
    expect(link).to.equal('http://our.website.com/#/people/management/search');
    done();
  });
});
They key is this line: var link = yield nightmare.... This uses a generator to return the promise back to the test runner to await completion. Things written after the generator will execute in a .then() after the promise completes.
Hit me up with questions if you have any!